robotic arts intro/Spring 2011 (final project description, 1st time students in this class please read!)
week 1 , (classwork/assignment), week 2 , week_3 (soldering workshop) week_4 (assignment), week_5 week_6 week_7 (assignment), week_8 (assignment), week 9 (assignment)
class server space Please check to see if you have a class folder in the IM277_01 class folder for Spring '11 now. if you don't, please send a message to: help@mica.edu immediately.
***
interactivity is a relationship of mutual influence, analogous to a conversation, and enacted by a process typically involving four steps:
1. input
2. processing
3. output
4. feedback
Process is a series of tasks that result in a goal.
Computation is the act of determining the specific tasks and the instructions to accomplish those tasks that need to be performed to reach the goal. If one can specify a sequence of tasks and related instructions which when followed will result in the completion of the goal then the problem is thought to be computable. Computation is about breaking a process into a series of tasks. Often these tasks must be performed in a specific sequence, where, for example, the performance of task 2 is predicated on the performance of task1, etc… A series of tasks leading to a specific result is called an Algorithm.
Code is a system of signals used to represent letters or numbers in transmitting messages.
A system of symbols, letters, or words given certain arbitrary meanings, used for transmitting messages requiring secrecy or brevity.
A system of symbols and rules used to represent instructions to a computer. Programming languages are comprised of code. Programs themselves are Algorithmic.
an Algorithm is a series of tasks leading to a specific result. Do you hear that echo? Scripts, and programs can be considered Algorithms. Successful Algorithms:
1. Reach their goal.
2. Are Lean (no redundancy or extraneous steps).
3. Are designed for the specific system that will run (parse) them in mind.
4. May be Unilateral/one dimensional or Interactive/Adaptive.
Another term that we can use when developing an algorithm, is narrativity.
Narrativity is a specific quality of different media that advances the interaction toward a specific goal.
- If you think of your project as a story, and you can think about a story as a process, narrativity is the level to which specific parts of the story keep things moving to specific moments or events or places within the narrative structure.
- Sometimes you want things to move along quickly toward specific points, and sometimes you don’t.
- What do you want the participants to experience, and why?
- How do the experiences you want to create for the participant relate to each other, and how do they all function to support your intention for your project?
- In short, how do you keep your participants engaged in your interaction schema?
in our class we will focus on learning through making, interactivity, and narrativity,
what about works that aren't interactive?
- works/projects that don't respond to their environment at all are called static
- works that receive and respond to input in pre-defined, and relatively simple ways, and do not vary their output (or adapt) to users over time are called responsive.
- it is essential that you learn to differentiate between static, responsive, and interactive forms.
Your final projects will be presented at robotfest, which will occur on SATURDAY April 30th, at the Historical Electronics Museum in Linthicum – this is mandatory!!!! this year's robotfest will feature a fashion show for those of you working with wearables/lilypad, etc.
- We will arrive at the Museum by 10am and be done by 3pm.
- Please block out a lot of time over the last two weeks in april to complete your projects!!!
- Documentation of your final project is due on the last class for the semester.
- Each of you is required to submit your final documentation on time. Failure to submit documentation (video/audio) of your project will result in a LOWER FINAL GRADE. We will go over documentation strategies during class, prior to the Robotfest.
- robotfest
if this is your first time taking this class please read, if you elect to use plan B (below), you must notify me by the end of week 8, NO EXCEPTIONS:
we will have a final presentation of completed works at RobotFest on the final saturday of April. we will also have a presentation of project proposals and prototypes during the last week of april at a location TBD.
plan B
in lieu of a completed final project 1st semester robotic arts students may realize and present a working prototype and presentation during the last week in april.
the working prototype and presentation must include the following:
a functioning circuit that demonstrates a key input/output of their proposed project.
a presentation of their research on the topic of their work, including
relevant works by others in the arts and sciences.
a demonstration of their working prototype.
a brief q/a period with the audience.
a final document of their prototype/research and presentation, compressed, and emailed to me by no later than may 5.
rationale:
sometimes, for students new to robotic arts, the learning curve is steep, and completing a final project that reflects your genuine interests and skills is difficult. the goal of this class, for the new student, is to open a door towards working with the exciting and emerging medium of robotic arts. if, at mid-term, you feel you will be unable to complete a working, final project that reflects your interests in this area, you may create a presentation as stated above. the hope is that your presentation will help you locate your interests within this medium and motivate you to continue in future semesters.
sometimes, for students new to robotic arts, the learning curve is steep, and completing a final project that reflects your genuine interests and skills is difficult. if, at mid-term, you feel you will be unable to complete a working, final project you have another option.
i assume you are sincere and hardworking. if you prove to me that you are choosing plan B out of laziness you will receive a final grade befitting a slacker. if, at any point during the semester, you are unsure of your standing in the class please speak with me.
***
Welcome to the world of arduino, arduino lilypad, and jeenode
Arduino The Documentary (2010) English HD from gnd on Vimeo.

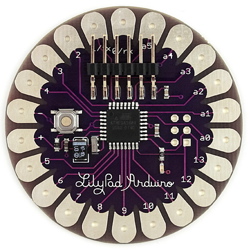
lilypad
jeenode
- getting started with arduino - you can purchase a pdf version for $9.99
- arduino software
- online arduino tutorials that follow and supplement 'getting started with arduino', above.
- basic electronics, including soldering, common parts, etc..
- fritzing
What to buy (you'll be using either an arduino, a lilypad, or a jeenode, the choice is yours, we'll go over all of them):
Arduino
Lilypad Arduino
- lilypad pro kit
- alligator clips with leads, please buy (2) 10 packs - so 20 alligator clips with leads total, part # 05ALS2
- breadboard # 03MB104 (you don't need the wire kit)
Jeenode
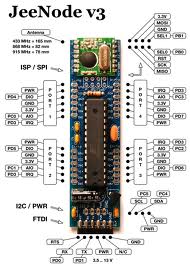
- Jeenode (an arduino clone with an onboard rf module) ***the jeenode has fewer I/O pins than the arduino or lilypad.
- includes optional ports library
additional resources:
- softwear (***free ebook on wearables - lilypad/arduino, etc.)
- arduino
Make Magazine
instructables
leah beuchley intro to the lilypad arduino - practical arduino (book)
- 30 arduino projects for the evil genius
- google searches on lilypad, arduino
- youtube searches on lilypad, arduino
- conductive threads delicious page
- problemboard delicious page
where to buy stuff, online, and locally:
- electronix express
- sparkfun
- moderndevice
- digikey
electronics goldmine (***slow shipping***) - all electronics
- baynesville electronics (***on joppa road - expensive, but in an emergency...)
- middle river hobbies (***motors, other hobby electronics gear***)
- servocity (***where to buy servo motors***)
- american science and surplus
- octopart (a search engine just for electronic parts)
Electronic Art, Artists, and Projects List
***
Tonight we're going to introduce the class, answer questions, watch a new and exciting documentary on the arduino, and build our jeenode kits!
we'll start with the class resources, and download the software for arduino, and fritzing.
- order and download 'getting started with arduino'
- review the exercises we covered in class.
- familiarize yourselves with fritzing (ie, download it and go through the first lesson)
- upload 3 links to projects/ideas/whatever that interest you and relate to our work, to our delicious site. PLEASE BE SURE TO TAG YOUR LINKS. (we'll give you the password tonight).
class presentations
Announcement>>
The 2nd Annual "Techno-Swap-Fest" is just 30 days from now at the National Electronics Museum in Linthicum, MD on Saturday, Feb 19, 2011. It's going to be a flea market/swap meet, attracting people from a wide range of interests and hobbies. There are already 20+ tables reserved by sellers, so there will be lots of good stuff (aka. junk) for buyers to look at and purchase. We still have a few tables that can be reserved.
We also have an impressive list of sponsoring organizations for our second year, as listed here:
https://sites.google.com/site/technoswapfest2/sponsors
Please help advertise the event by passing along the event brochure to any hobbyists, clubs, organizations or businesses that may be interested. The brochure can be downloaded from the following web site:
https://sites.google.com/site/technoswapfest2/
by clicking the "Brochure" link in the left navigation menu.
If you're interested in selling some precious stuff (aka. junk) or becoming a sponsoring organization (free), just send email to techno.swap.fest@gmail.com to register.
The event is open to anybody who builds anything and all types of items (non-lethal please) are welcome. The goal is to bring together hobbyists of all kinds and try to replace the old clutter in our workshops with newer clutter :-)
buttons, LEDs, PCB, resistors, wire (hookup/magnet/wire wrap), and potentiometers.
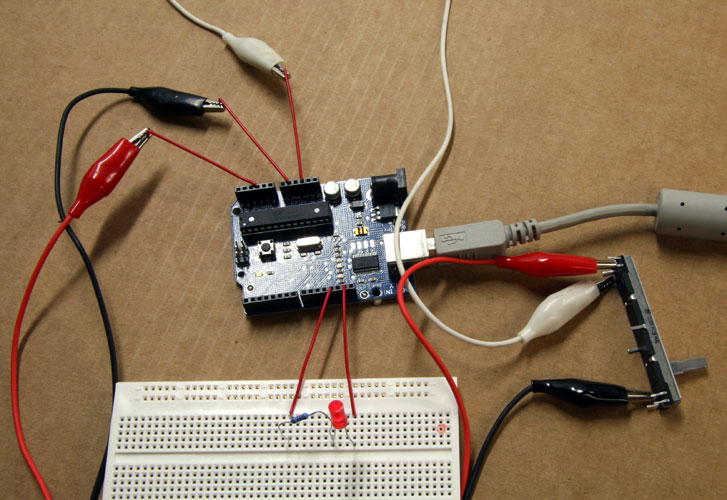
in preparation for our construction of the jeenodes next week, we're going to build a simple working board containing some tri-color LEDs from superbrightleds, some buttons, and some potentiometers from electronixexpress.
what you'll need:
- soldering station
- solder
- tip cleaner
- wire snips
- PCB (printed circuit board, about 3"x3")
- a few tri-color LEDs
- a few resistors
- a button
- a potentiometer
- some wire (hookup - we'll get into the replacements for conductive thread, magnet wire and wire-wrap, a little later).
phase 1:
wiring the tri-color LED, **be sure to leave room for 2 more tri-color LEDs on your PCB!!
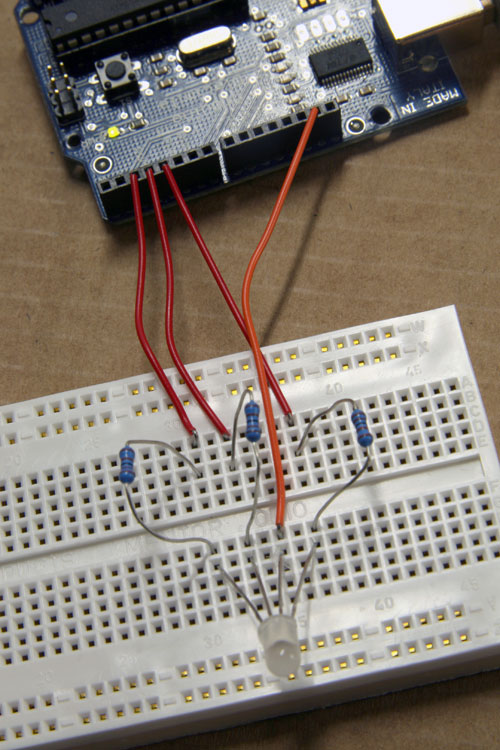
done? test your work by connecting your circuit to your arduino/lilypad, and running the blink.pde sketch from the
examples->basics folder.
today we're going to apply our newly acquired soldering skills to assemble the Jeenode!
this will take a bit of time, DON'T RUSH, and if you are unsure of a connection ASK B4 U SOLDER.
tonight we'll start by doing a site visit to the exhibition space on 307 baltimore st.
when we return, we'll have some student presentations, and then do some arduino/jeenode programming exercises.
assignment:
prepare a proposal for where you'd like to install your work for the april 27th exhibit at 307 baltimore st.
propose 3 different locations: your first choice, second choice, third choice.
present all the materials you'll need, and exactly how much space you'll need for your work, including the space on the periphery of the piece.
programming the arduino excerises:
please pick a partner, get your LED/potentiometer circuit, and ------------>
start with this tutorial
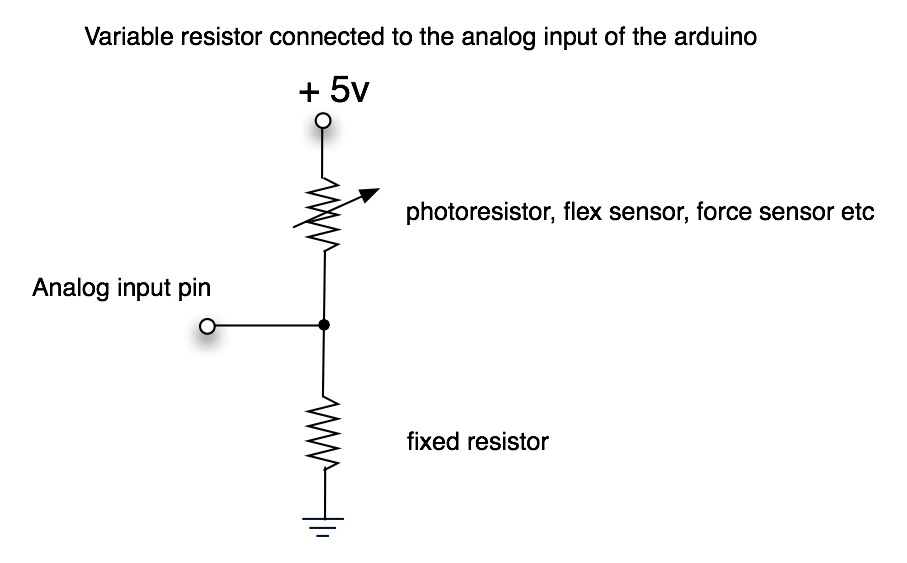
you'll notice that the arduino (above) has numbers associated with its headers. there are digital pins and analog pins clearly labelled on the board.
the lilypad also has its inputs/outputs labelled with numbers - the eyelets with an 'a' in front of them are the analog pins - the others are digital.
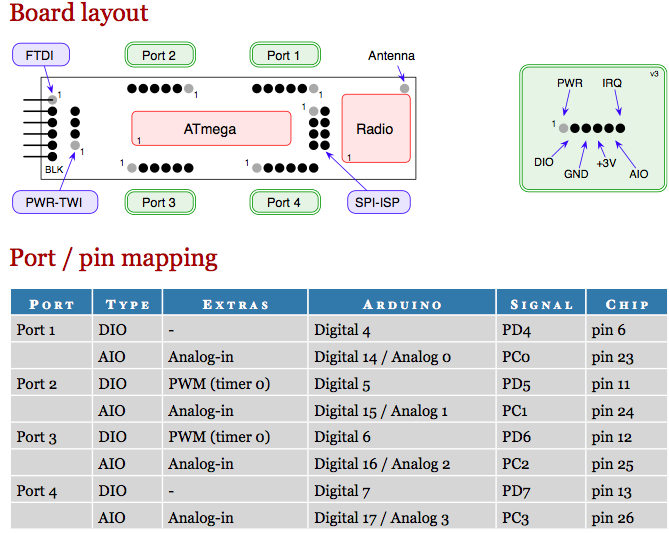
if you are using a jeenode, things look a bit different. here are the pin equivalencies between the jeenode and arduino.
ok?
if you're done with the practice sketches above:
create two variations on the code (ie, change the pattern of blinking lights). then do the first 2/3 (up till PWM) of this tutorial.
study the for loop section, as well as the random number section.
making friends with the random:
**adding random fluctuations in the flow of your scripts can give your work personality.
try randomizing the length of the:
int del variable in the example sketches and see how it changes your scripts.
use/study the randomSeed function.
create at least two variations on anyof the scipts you've written the incorporate random quirks.
done?
onward to PWM! (ie, brightening and dimming your LEDs).
take your time and carefully study the PWM sketch.
do you understand how the nested for loops are functioning?
hint: follow the incrementing variables (i, j)and curly braces {}.
do you understand how the random function is working at the end of the script?
take your time, and don't move on until you understand everything we've done thus far.
next we're going to add if statements and an analog sensor to our circuit: